前置きに続いて早速ed25519-sk鍵タイプを試していきます。
% sw_vers
ProductName:	macOS
ProductVersion:	12.0.1
BuildVersion:	21A559
% ssh -V
OpenSSH_8.6p1, LibreSSL 2.8.3
% sw_vers
ProductName:    macOS
ProductVersion:    11.6
BuildVersion:    20G165
% ssh -V
OpenSSH_8.1p1, LibreSSL 2.7.3
Contents
macOS: 準備
YubiKeyの選択の仕方は前置きをご覧ください。青いYubiKeyでもFIDO U2FかFIDO2の機能があれば使えるはずです。今回はfirmware 5.2.4の青いSecurity Keyシリーズで確認しています。5.2.3未満の場合はecdsa-skでお試しください。 ecdsa-skはP-256楕円曲線だけなので使う理由があるのかは謎です。
2021-11-22追記: Montereyで標準のOpenSSHのバージョンが-sk対応の8.6になりました。Appleのカスタマイズは OpenSSH-267.40.5 という版数でされたようです。ビルド時に –with-security-key-builtin が付いていないようなので、そのままでは -sk 鍵タイプを扱うことはできませんでした。使う場合は以下のBig Surと同じような手順を踏むことになります。一方でOpenSSH 8.6p1を prefix=~/openssh/ でビルドしてinstall、export SSH_SK_HELPER=~/openssh/libexec/ssh-sk-helper 、それに加えて無理くり sk-usbhid.c をコンパイルして /usr/local/lib/libsk-libfido2.dylib として置き、 export SSH_SK_PROVIDER=/usr/local/lib/libsk-libfido2.dylib とすることで /usr/bin/ssh-agent と /usr/bin/ssh-add -K の組み合わせで discoverable credential(resident identity)の追加はできたので部分的に対応できるようですが、ざっと動かして/usr/bin/ssh-agentにdiscoverable credential追加する以外の動作を確認することはできませんでした。SKヘルパーとSKプロバイダーの提供か内蔵で -sk が使えるようになるにはまだかかりそうです。またAppleが独自に追加して本家とぶつかっていた ssh-add のKeychain用のオプションが変更になっています。末尾に雑ですが記録を追加しておきます。
Big Sur標準のOpenSSHのバージョンが-sk非対応の8.2未満なのでHomebrewを使います。macOS付属のOpenSSHが8.2以上になり、 /usr/libexec/ssh-sk-helper が追加された暁にはクライアント側までスキップしてください。
% brew install openssh
==> Downloading https://ghcr.io/v2/homebrew/core/openssl/1.1/manifests/1.1.1l
...

% brew list
==> Formulae
ca-certificates	ldns		libfido2	openssh		[email protected]	sqlite
gdbm		libcbor		mpdecimal	[email protected]	readline	xz
...
libfido2もインストールされました。ありがたいです。権限周りはどうにかして欲しいですが… Intel Macであれば何もしてなければ /usr/binより前に/usr/local/bin にPATHが通っているのでそのまま使えるはずです。/usr/localを前に出すのもPATHに入れるのも躊躇する派(危険性うんちゃらよりもデフォルトとの違い重視、POSIX標準でないGNUのツールが前に来ると泣いちゃうからですが、/usr/local/binにユーザが書けるというのはどうでしょう。その人専用機前提ですね…)なので~/.zshrc(お使いの$SHELLに合わせて)でaliasしておきます。後ほど再度いじります。
for c in scp sftp slogin ssh ssh-add ssh-agent ssh-keygen ssh-keyscan; do alias $c=/usr/local/bin/$c; done
% source ~/.zshrc

% \ssh -V
OpenSSH_8.1p1, LibreSSL 2.7.3

% ssh -V
OpenSSH_8.8p1, OpenSSL 1.1.1l  24 Aug 2021

% fido2-token -L
IOService:/AppleACPIPlatformExpert/PCI0@0/AppleACPIPCI/XHC1@14/XHC1@14000000/HS08@14700000/Security Key by Yubico@14700000/IOUSBHostInterface@0/AppleUserUSBHostHIDDevice: vendor=0x1050, product=0x0120 (Yubico Security Key by Yubico)
良さそうです。
macOS: クライアント側
クライアント側を整えていきます。
% ssh-keygen -t ed25519-sk
Generating public/private ed25519-sk key pair.
You may need to touch your authenticator to authorize key generation.
Enter PIN for authenticator:
Enter file in which to save the key (/Users/est/.ssh/id_ed25519_sk):
Enter passphrase (empty for no passphrase):
Enter same passphrase again:
Your identification has been saved in /Users/est/.ssh/id_ed25519_sk
Your public key has been saved in /Users/est/.ssh/id_ed25519_sk.pub
The key fingerprint is:
SHA256:3/6D+XpHsCNfUURKJUVeQcqLzhr+aegOrD0hlX7yy5o [email protected]
The key's randomart image is:
+[ED25519-SK 256]-+
|              +OO|
|            ...+o|
|        .    o. o|
|       o    . o. |
|      o S  . . o.|
|     ..+ oo.. o o|
|      .o=.oo.= + |
|      o.=ooo+ + .|
|     . E=B+oo=oo |
+----[SHA256]-----+
FIDO2対応のYubiKeyの場合はYubiKeyのFIDO2 PINを訊かれます。入力するとピカピカ光ってタッチを要求されます。タッチすると鍵情報を保存するファイル名を訊かれます。入力すると鍵情報ファイルを暗号化するためのパスフレーズを訊かれます。このパスフレーズは-O residentを指定した場合のYubiKey内の鍵情報には適用されません。あくまでもファイル(ここでは鍵ハンドルが格納されている~/.ssh/id_ed25519_sk)の暗号化のためのものです。またFIDO2の -O verify-required についてはOpenSSH 8.4からとなっていて現時点(as of 2021-10-15)でソースからのビルドが必要な環境が出てくるので後日検証にしてしまいます。今回は -O オプションの指定はしないで進行します。
ssh-agent周りのあれこれ
macOS付属のssh-agentはがっつりSIP(電話ではなく)に守られた /System/Library/LaunchAgents/com.openssh.ssh-agent.plist で起動します。なので戦わずに共存する道を探ります。macOS付属のOpenSSHが8.2以上になった暁にはサーバ側までスキップしてください。またYubiKey使う旨みが減りそうですがssh-agentを使わないで試す場合にもスキップしてください。今回は2つの方法を試しました。
macOSでAppleがカスタマイズしていないssh-agentを使う – 方法1
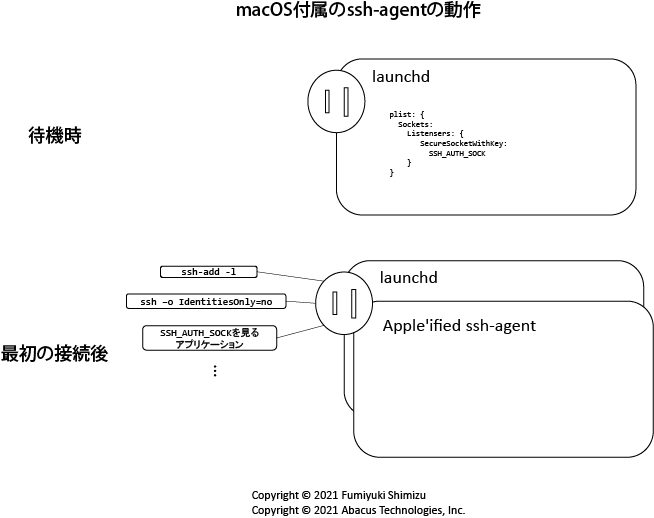
何からssh-agentを起動するかはmacOSなのでlaunchdが便利です。launchdがmacOS付属のssh-agent用の環境変数SSH_AUTH_SOCKを設定するため、これを上書きする手順はなんにせよ必要になります。 /System/Library/LaunchAgents/com.openssh.ssh-agent.plist で使われている SecureSocketWithKey はソケットに通信が発生してからssh-agentを起動する、遅延起動式で、図にするとこんな感じになります。
これをproxyすればAppleがカスタマイズしていないssh-agentも使えるはずです。こんな感じです。
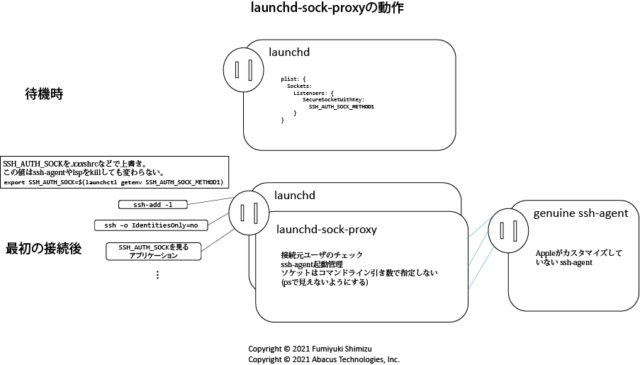
Appleがどのように手を入れているかはSource Browserで確認でき、ncやsocatではできないことがすぐにわかります。ncやsocatのパッチを作るのも良いかもしれません。あと引き数をコマンドライン以外から受けるパッチもでしょうか。というわけでpsコマンドなどで見えるコマンドラインにソケットの場所を書きたくないのもあり、さくっとproxyを書きます。C++でソケットプログラミングとか何年ぶりかわかりませんがc++XX情報のアップデートもしながら書いてみました。たのすぃ~。ひゅう~。C++ファイルひとつでMakefileもいらんだろうという…
-std=c++20が使えるコンパイラが無い場合はインストールします。
% brew install gcc
コンパイル、リンクします。
% git clone https://github.com/fmrns/launchd-sock-proxy.git
% cd launchd-sock-proxy
% g++ -std=c++20 -o launchd-sock-proxy launchd-sock-proxy.c++
配置します。ここでは~/bin/をコマンド置き場、~/tmp/をデバッグログなどの出力先、 ~/Library/LaunchAgent をplistを置く場所とします。また設定ファイル内では ~/ は /Users/est/ としているので、ご自身の環境に合わせます。
% mkdir -p ~/bin ~/tmp ~/Library/LaunchAgent
% cp -p launchd-sock-proxy ~/bin/
% cp -p local.method1.plist ~/Library/LaunchAgent
~/Library/LaunchAgent/local.method1.plist を編集します。launchd-sock-proxyを置いた場所に合わせてください。ssh-agentが /usr/local/bin/ssh-agent ではない場合は、フルパスをlaunchd-sock-proxyの第一引き数に渡してください。直後に<string>/..(その場所)…./ssh-agent</string>を追加します。
<key>ProgramArguments</key>
	<array>
		<string>/Users/est/bin/launchd-sock-proxy</string>
plistの文法チェックをしてロードします。
% plutil ~/Library/LaunchAgent/local.method1.plist
% launchctl unload -w ~/Library/LaunchAgent/local.method1.plist
% launchctl   load -w ~/Library/LaunchAgent/local.method1.plist
zshをお使いならば.xshrcを参考に.zshrcに追記、kshをお使いならば.xshrcを参考に.kshrcに追記、tcsh, cshをお使いならば.cshrcを参考に~/.cshrcに追記します。SSH_AUTH_SOCKの上書きです。macOS標準のsshコマンド群も同時に使いたい場合は上書きしないでaliasなどで指定することもできるので、後述の方法2のaliasを参考にしてください。
$ export SSH_AUTH_SOCK=$(launchctl getenv SSH_AUTH_SOCK_METHOD1)
% setenv SSH_AUTH_SOCK launchctl getenv SSH_AUTH_SOCK_METHOD1
新しいシェルを起動するか今のシェルに環境変数を適用してSSH_AUTH_SOCKが変わることを確認し、実際に動かします。
% ps -ell | fgrep ssh-
% echo $SSH_AUTH_SOCK
% source ~/.zshrc
% echo $SSH_AUTH_SOCK
% ssh-add -L
% ps -ell | fgrep ssh-
/usr/local/bin/ssh-agent など目的のssh-agentが動いているようでしたら、既存のシェルがどちらを利用する設定なのかわからなくなるので一度ログインしなおすか、再起動してしまうのが良いかもしれません。
macOSでAppleがカスタマイズしていないssh-agentを使う – 方法2
方法1と同じくlaunchdを使うとして、こちらは単純にssh-agentの遅延起動無しでさっさと起動してしまう方法です。ssh-agentがkillされた場合はソケットの場所が変わり、それを必要な人に通知する方法が必要です。コマンドラインでソケットの場所を指定するのは方法1同様に避けます。ストレートフォワードにこんな感じになるかと思います。
環境変数を .xshrc で上書きするのが -a で終わるファイル、実行時に取得してその場だけで使うのが -b と -c で終わるファイルです。-c で終わるファイルは、~/bin/ssh-add などに symlink して使います。どれでも状況に応じて好きなものをお使いください。
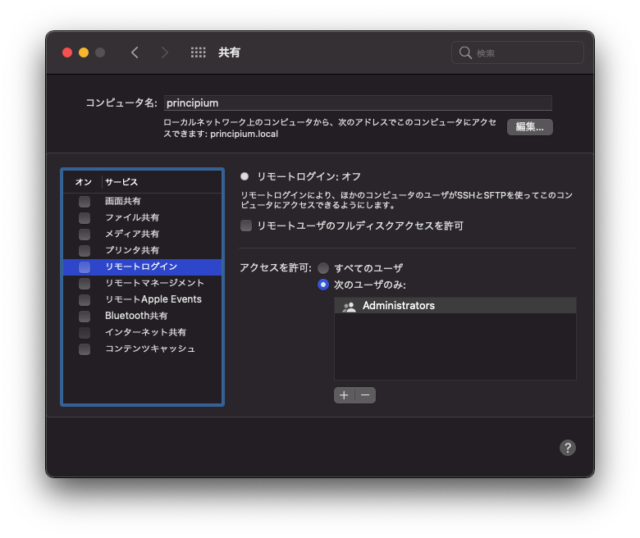
macOS: サーバ側
公開鍵をサーバまで持っていきログインするユーザの ~/.ssh/authorized_keys に追加、無ければ作成して追加します。
% mkdir -p ~/.ssh
% chmod go= ~/.ssh
% echo >>~/.ssh/authorized_keys
% cat id_ed25519_sk.pub >>~/.ssh/authorized_keys
設定はこれだけで、既に8.2以降のOpenSSHサーバが動いている場合はそのまま利用できるので接続までスキップしてください。
macOS: サーバも同じ機械で動かす
同じ機械ですでにmacOS付属のOpenSSHサーバを動作させている場合は、間違わないように停止すると良いかもしれません。
クライアントOSでわざわざsshdを自力でインストールして動かし続けるのを強くお勧めはしないので簡単に。万が一動かし続ける場合は適切な設定に加えてHomebrewおよびOpenSSHの脆弱性情報によく注意されてください。
/usr/local/etc/ssh/sshd_config を適切に設定します。macOS付属のOpenSSHと区別がつくように、ポートを設定します。HostKeyを明示している場合はEd25519の鍵を参照するように指定します。HostKeyを明示する場合は今の世の自分用にecdsa-skを使うとき以外では不要なECDSAを有効にする必要はないです。
...
#Port 22
Port 8937
...

#HostKey /usr/local/etc/ssh/ssh_host_ecdsa_key
HostKey /usr/local/etc/ssh/ssh_host_ed25519_key
...
PermitRootLogin no
...
PasswordAuthentication no
PermitEmptyPasswords no
...
起動します。止め忘れないようにフォアグラウンドで動かします。
% sudo chown 0 /usr/local/etc/ssh
% sudo chown 0 /usr/local/etc/ssh/sshd_config
% sudo chmod go-w /usr/local/etc/ssh/sshd_config
% /usr/local/sbin/sshd -D
別のターミナルから確認します。
% lsof -ni | fgrep sshd
sshd      3769 est      4u  IPv6 0xb68090942d4312d      0t0  TCP *:8937 (LISTEN)
sshd      3769 est      5u  IPv4 0xb6809093f571a7d      0t0  TCP *:8937 (LISTEN)
macOS: 接続
いよいよ接続です。どんどんいきます。
% ssh -V
OpenSSH_8.8p1, OpenSSL 1.1.1l  24 Aug 2021

% ssh -p 8937 -i ~/.ssh/id_ed25519_sk -F /dev/null ::1
Enter passphrase for key '/Users/est/.ssh/id_ed25519_sk':
Confirm user presence for key ED25519-SK SHA256:Osr/fJfu4/ZLGpRaF68VEgWOh5cRJ0vg1H8R2SGs0UE
User presence confirmed
Last login: Thu Oct 21 18:05:34 2021
% exit
Connection to ::1 closed.

% ssh -p 8937 -i ~/.ssh/id_ed25519_sk -F /dev/null ::1
Enter passphrase for key '/Users/est/.ssh/id_ed25519_sk':
Confirm user presence for key ED25519-SK SHA256:Osr/fJfu4/ZLGpRaF68VEgWOh5cRJ0vg1H8R2SGs0UE
User presence confirmed
Last login: Thu Oct 21 18:05:34 2021
% exit
Connection to ::1 closed.
まず鍵ハンドルファイルのパスフレーズを訊かれ、入力するとYubiKeyがピカピカし始めるので、タッチすればログインできます。念のため繰り返して、再度パスフレーズを訊かれることを確認しました。続いてssh-agentを試します。
% ps -ell | fgrep ssh-
  501  4570  4257     4006   0  31  0  4268300    592 -      S+                  0 ttys002    0:00.00 fgrep ssh-

% ssh-add -l
The agent has no identities.

% ps -ell | fgrep ssh-
  501  4575     1      144   0  20  0  4293340    536 -      Ss                  0 ??         0:00.00 /usr/local/bin/ssh-agent
  501  4577  4257     4006   0  31  0  4268300    444 -      R+                  0 ttys002    0:00.00 fgrep ssh-

% ssh-add ~/.ssh/id_ed25519_sk
Enter passphrase for /Users/est/.ssh/id_ed25519_sk:
Identity added: /Users/est/.ssh/id_ed25519_sk ([email protected])

% ssh-add -l
256 SHA256:Osr/fJfu4/ZLGpRaF68VEgWOh5cRJ0vg1H8R2SGs0UE [email protected] (ED25519-SK)

% ssh -p 8937 -F /dev/null ::1
Last login: Thu Oct 21 18:27:38 2021
% exit
Connection to ::1 closed.

% ssh -p 8937 -F /dev/null ::1
Last login: Thu Oct 21 18:27:38 2021
% exit
Connection to ::1 closed.
ssh-add した際に訊かれたパスフレーズを最後に、あとはしれっとYubiKeyが点滅するのでタッチするだけです。点滅が目に入る場所にYubiKeyがない場合は、SSHあるあるの逆引きで手間取ってるのかと思って一息ついてしまうところです。-sk鍵タイプの場合はタッチ要求されるかもよと一言表示してもらえると嬉しいかもと思いました。
ssh-agent を使うと-sk鍵タイプ以外では何もなかったかのようにログインできるところを-sk鍵タイプではタッチが必要となり、期待していた安心感が得られそうなのでめでたしです。Appleがカスタマイズしているssh-addは-KオプションがKeychainに追加するために使われていますが、純正ssh-addの-Kはdiscoverable credentialsの読み込みとなっているのでどうなるでしょうか。
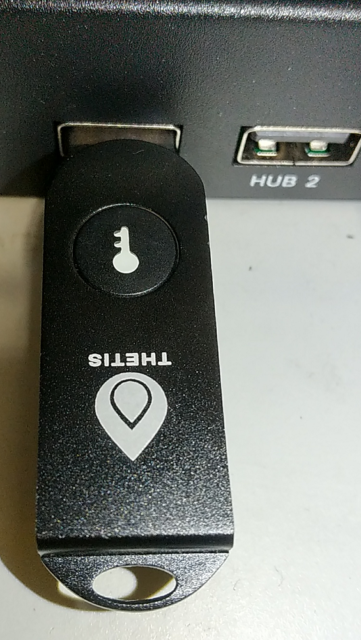
macOS: 番外編 THETIS
YubiKey以外にもFIDO U2Fデバイス持っていることを思い出したので試しました。もう近所の通販では買えないようですが、Thetis FIDO U2F Security Keyというものです。YubiKeyは鍵とぶつかり合ってUSBの接点が削れるような荒い使い方をしていたのでカバー付きのThetisを結構気に入ってましたが、荒い使い方はUSB-CのYubiKey 5Cにその座を奪われました。
% ssh-keygen -t ed25519-sk
Generating public/private ed25519-sk key pair.
You may need to touch your authenticator to authorize key generation.
Key enrollment failed: invalid format

% ssh-keygen -t ecdsa-sk
Generating public/private ecdsa-sk key pair.
You may need to touch your authenticator to authorize key generation.
Enter file in which to save the key (/Users/est/.ssh/id_ecdsa_sk):
Enter passphrase (empty for no passphrase):
Enter same passphrase again:
Your identification has been saved in /Users/est/.ssh/id_ecdsa_sk
Your public key has been saved in /Users/est/.ssh/id_ecdsa_sk.pub
The key fingerprint is:
SHA256:WxJjRGjL1BUiajNmurfLAvUGOa++E/I/b36zFqEI1Io [email protected]
The key's randomart image is:
+-[ECDSA-SK 256]--+
|   .  .++.o.     |
|  . ..+o..       |
| o oB+ .+        |
|E B= oo..o       |
| ..* . .S..      |
|o ..= . .+       |
| +.+.   ..       |
|  =o... +        |
| .o==*oo.o       |
+----[SHA256]-----+

% ssh-add ~/.ssh/id_ecdsa_sk
Enter passphrase for /Users/est/.ssh/id_ecdsa_sk:
Identity added: /Users/est/.ssh/id_ecdsa_sk ([email protected])

% ssh-add -l
256 SHA256:Osr/fJfu4/ZLGpRaF68VEgWOh5cRJ0vg1H8R2SGs0UE [email protected] (ED25519-SK)
256 SHA256:WxJjRGjL1BUiajNmurfLAvUGOa++E/I/b36zFqEI1Io [email protected] (ECDSA-SK)

% ssh -p 8937 -F /dev/null apple@pen
Last login: Thu Oct 21 18:27:38 2021
apple@pen ~ % exit

% ssh-keygen -t ecdsa-sk -O resident
Generating public/private ecdsa-sk key pair.
You may need to touch your authenticator to authorize key generation.
Enter PIN for authenticator:
Key enrollment failed: invalid format
こちらはP-256曲線のECDSAでちゃんと使えました。FIDO2デバイスではないのでPINの入力は求められず、-O residentによるdiscoverable credentials(CTAP2.1)も作成できませんでした。
macOS: Monterey
現状は以下のような感じでした。ご参考まで。
% sw_vers
ProductName:	macOS
ProductVersion:	12.0.1
BuildVersion:	21A559

% /usr/bin/ssh -V
OpenSSH_8.6p1, LibreSSL 2.8.3

% /usr/bin/ssh -Q key
ssh-ed25519
[email protected]
[email protected]
[email protected]
ssh-rsa
ssh-dss
ecdsa-sha2-nistp256
ecdsa-sha2-nistp384
ecdsa-sha2-nistp521
[email protected]
[email protected]
[email protected]
[email protected]
[email protected]
[email protected]
[email protected]

% /usr/bin/ssh-add -K
WARNING: The -K and -A flags are deprecated and have been replaced
         by the --apple-use-keychain and --apple-load-keychain
         flags, respectively.  To suppress this warning, set the
         environment variable APPLE_SSH_ADD_BEHAVIOR as described in
         the ssh-add(1) manual page.

% export APPLE_SSH_ADD_BEHAVIOR=openssh

% brew install autoconf automake libtool libfido2
% git clone https://github.com/openssh/openssh-portable/releases/tag/V_8_6_P1
% cd openssh-portable-V_8_6_P1
% autoreconf
% export PKG_CONFIG_PATH=/usr/local/opt/[email protected]/lib/pkgconfig
% ./configure -v --prefix=$HOME/openssh8.6p1 --with-ssl-dir=/usr/local/opt/[email protected] --with-security-key-builtin
% make
% make install   # to ~/openssh8.6p1

% cp -p misc.c misc-sk.c
###### edit misc-sk.c to export monotime_tv()
% cc -DSK_STANDALONE -DWITH_OPENSSL -Wno-error=implicit-function-declaration -I. -I/usr/local/opt/[email protected]/include -fPIC sk-usbhid.c misc-sk.c openbsd-compat/explicit_bzero.o openbsd-compat/freezero.o openbsd-compat/recallocarray.o -o libsk-libfido2.dylib -shared -L/usr/local/opt/[email protected]/lib -lfido2 -lcbor -lcrypto -lc
% cp -p libsk-libfido2.dylib /usr/local/lib/
% export SSH_SK_HELPER=~/openssh8.6p1/libexec/ssh-sk-helper
% export SSH_SK_PROVIDER=/usr/local/lib/libfido2.1.dylib
% /usr/bin/ssh-agent -s -d
SSH_AUTH_SOCK=/var/folders/3g/j2kc_pvs2z5g57h3m_py5htc0000gn/T//ssh-25ICilhpL4ft/agent.24856; export SSH_AUTH_SOCK;
echo Agent pid 24856;
debug1: new_socket: type = SOCKET
debug2: fd 3 setting O_NONBLOCK
debug1: new_socket: type = CONNECTION
debug3: fd 4 is O_NONBLOCK
debug1: process_message: socket 1 (fd=4) type 11
debug2: process_request_identities: entering
debug1: new_socket: type = CONNECTION
debug3: fd 4 is O_NONBLOCK
debug1: new_socket: type = CONNECTION
debug3: fd 4 is O_NONBLOCK
debug1: process_message: socket 1 (fd=4) type 25
debug2: process_add_identity: entering
debug1: parse_key_constraint_extension: constraint ext [email protected]
debug1: process_add_identity: add [email protected] SHA256:GBtAySoSJylx/1uioAqPj7WuDWVRndmBfOKqHvsIWIE "" (life: 0) (confirm: 0) (provider: /usr/local/lib/libsk-libfido2.dylib)
debug1: new_socket: type = CONNECTION
debug3: fd 4 is O_NONBLOCK
debug1: process_message: socket 1 (fd=4) type 11
debug2: process_request_identities: entering
debug1: process_message: socket 1 (fd=4) type 13
debug1: process_sign_request2: entering
Confirm user presence for key ED25519-SK SHA256:GBtAySoSJylx/1uioAqPj7WuDWVRndmBfOKqHvsIWIE
process_sign_request2: sshkey_sign: unknown or unsupported key type
User presence confirmed

########## on the other terminal
% export SSH_AUTH_SOCK=/var/folders/3g/j2kc_pvs2z5g57h3m_py5htc0000gn/T//ssh-25ICilhpL4ft/agent.24856
% export SSH_SK_PROVIDER=/usr/local/lib/libsk-libfido2.dylib
% /usr/bin/ssh-add -K
Enter PIN for authenticator:
Resident identity added: ED25519-SK SHA256:GBtAySoSJylx/1uioAqPj7WuDWVRndmBfOKqHvsIWIE
% ssh .....
sign_and_send_pubkey: signing failed for ED25519-SK "" from agent: agent refused operation
TODO
- proxyのデータをインターセプトして-sk以外はmacOS付属のssh-agentに流すようにしてKeychainの恩恵を得られるようにする?面白いけどパスワードはKeePassXCなのでKeychainどうでもよいしOpenSSH 8.2以降に対応するまでの命だからどうだろ。
次回はUbuntu、その次はFreeBSD、その次はCygwinです。ごきげんよう。